Posted on

Custom Stickers Versus Decals: What Is the Difference?

Custom Stickers Versus Decals: What Is the Difference?

If you have searched for a custom logo sticker, a window decal, or vinyl lettering, you have probably noticed that print shops do not always use the same words in the same way. One company may call a printed vinyl graphic a sticker. Another may call nearly the same product a decal.

That can make ordering confusing, especially when two products look similar on a screen but arrive with different layers and require different installation methods.

There is no universal naming rule followed by every printer. In everyday shopping, sticker and decal often overlap. The most useful way to tell them apart is to look at how the product is constructed, how it is applied, and what remains on the surface after application.

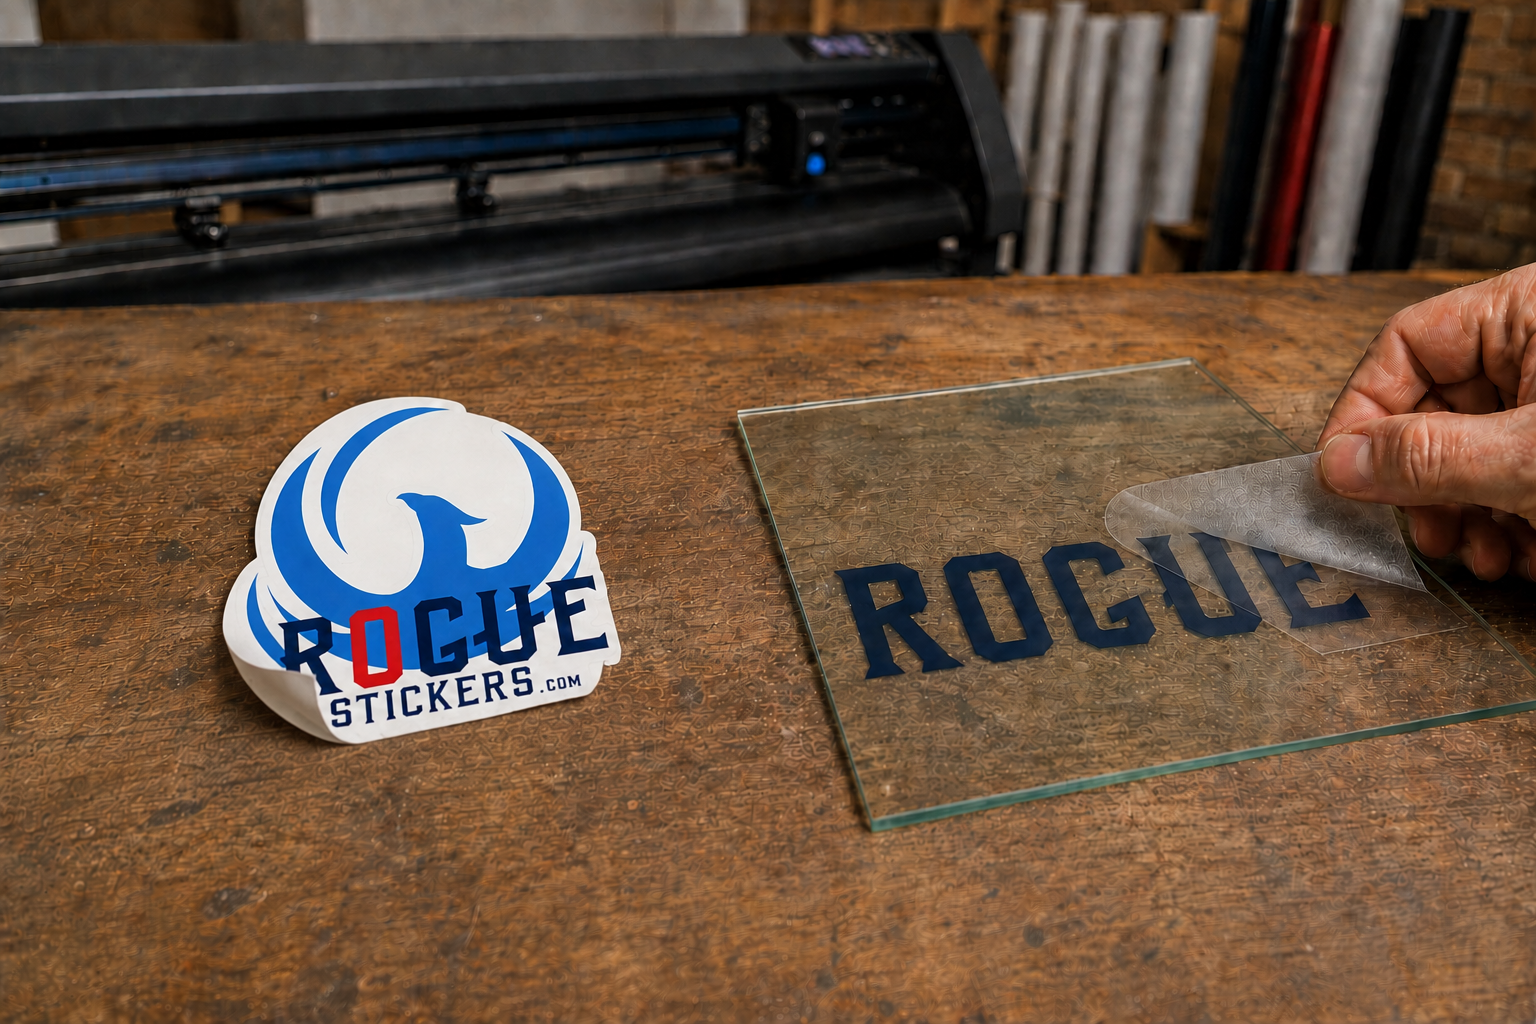
For this guide, a sticker means a single printed piece that you peel from its backing and apply directly. A transfer decal means a cut or printed design held together by application tape, which is removed after the design bonds to the surface.

What Is a Custom Sticker?

A custom sticker is usually one piece of adhesive material with artwork printed on its face. You remove the backing, position the sticker, and press the entire piece onto the surface.

The finished sticker may be a circle, square, rectangle, oval, or a custom shape. A custom die cut vinyl sticker follows the outside contour of the artwork, but it still applies as one complete piece.

This format works well when you want something that is easy to hand out, sell, place inside an order, or apply without extra steps. Common uses include:

  1. Water bottles and coolers

  2. Laptops and notebooks

  3. Product packaging

  4. Event giveaways

  5. Artist merchandise

  6. Branded inserts

  7. Toolboxes and equipment

A sticker can have a solid white base, a colored background, or a transparent base. The important point is that the printed material remains one connected piece after it is applied.

What Is a Transfer Decal?

A transfer decal is designed so separate letters, shapes, or parts of a graphic can be installed together in the correct position. It normally arrives in layers.

The liner protects the adhesive before installation. The actual vinyl or printed graphic forms the design. Application tape sits over the front and holds every part in alignment while the decal is placed.

After the design bonds to the surface, the application tape is peeled away. Only the intended lettering or graphic remains. There is no surrounding rectangle of sticker material.

This is why transfer decals are often chosen for:

  1. Store hours on glass doors

  2. Business names on windows

  3. Vehicle lettering

  4. Equipment identification

  5. Simple logos on smooth surfaces

  6. Directional signs

  7. Wall lettering made for a suitable wall surface

Rogue Stickers offers both single color die cut transfers and full color die cut transfers. The right version depends on the artwork and the intended appearance.

Are All Decals Transfer Decals?

No. This is where terminology becomes less precise.

Many sellers use decal as a broad word for a durable adhesive graphic, including printed vinyl pieces that apply exactly like stickers. You may see bumper decals, floor decals, wall decals, and window decals that do not use application tape at all.

The product name alone may not tell you what will arrive. Read the description and look for these details:

  1. Does the graphic apply as one complete printed piece?

  2. Does it include application tape?

  3. Will the background material remain visible?

  4. Are individual letters or design elements transferred to the surface?

  5. Is it meant for the exact surface where you plan to use it?

Those answers matter more than whether the product page says sticker or decal.

What Is the Main Visual Difference?

A standard sticker keeps its base material around and between the printed elements. A transfer decal can leave only the design itself on the surface.

Imagine a business name written in individual letters. As a white vinyl sticker, the letters could be printed inside one white rectangle or one custom shaped piece. As a cut vinyl transfer decal, each letter can adhere directly to the window while preserving the spacing of the original design. After the application tape is removed, the glass shows through every open area.

A clear vinyl sticker offers another option. Its transparent material can create a subtle appearance, but clear vinyl still remains between the printed areas. Depending on the artwork, surface color, ink, and lighting, that material may still be visible.

Which One Is Easier to Apply?

For most small projects, a regular sticker is easier. You peel it, place it, and press it down. Careful alignment still matters, but there are fewer layers to manage.

A transfer decal takes more patience. Every element must bond to the application surface before the top tape is removed. Large designs and fine lettering require especially careful pressure and alignment.

Application tape is not decorative packaging. It temporarily keeps the graphic together and helps move it to the final surface. Once the decal has been pressed firmly into place, the tape is removed and discarded.

Whatever format you choose, begin with a clean, dry surface. Dirt, oil, wax, dust, and cleaner residue can interfere with adhesion. Always follow the instructions supplied with the specific product because suitable cleaners, temperatures, and methods can vary by material and surface.

Should You Choose a Sticker or a Decal for a Vehicle?

Either format may be appropriate, but the goal determines the better choice.

A custom sticker can work well for a compact logo, bumper graphic, or promotional design that should apply in one piece. A transfer decal is often the cleaner option for individual lettering, a website address, a unit number, or a logo that should appear without a surrounding background.

Before applying anything to a vehicle, confirm that the material is intended for automotive use and that the paint is sound. Fresh paint, repaired paint, coatings, curves, trim, sensors, and textured plastic can change what is suitable. A large or complex vehicle graphic may be better handled by an experienced installer.

Texas heat and sun also make product selection important, but no responsible printer can promise one universal service life for every vehicle. Exposure, material, installation, maintenance, parking conditions, and surface condition all affect performance.

What Works Best for Storefront Windows?

Transfer decals are a strong choice when you want hours, lettering, or a logo to look as if it was placed directly on the glass. They preserve open space around the design and can produce a clean sign shop appearance.

Printed stickers are useful when the artwork needs a solid background, detailed illustration, photograph, or self contained shape. Clear stickers can work when you want the glass to remain visible, but artwork colors may interact with what is behind the window.

Think about viewing direction before ordering. A graphic applied outside the glass and read from outside is different from one applied inside and read through the glass. Window tint, reflections, interior lighting, and white ink can also change visibility. Tell the printer where the graphic will be installed and from which side it should be read.

Which Format Is Better for Packaging and Giveaways?

Custom stickers are usually the practical choice. They are easy to distribute, simple for customers to use, and familiar at merch tables, markets, festivals, and retail counters.

For an Austin restaurant, brewery, artist, or small business, a die cut sticker can carry a complete logo or illustration in one portable piece. It can be included with an order without asking the customer to follow a transfer process.

Transfer decals make more sense when the intended result is permanent looking lettering or a borderless graphic on a known surface. They are less convenient as a casual giveaway because the recipient needs to understand the layers and application process.

Can a Detailed Design Become a Transfer Decal?

Sometimes, but not every design is a good candidate.

Single color cut vinyl works best with clean shapes, readable lettering, and elements large enough to cut, weed, and transfer reliably. Tiny gaps, delicate lines, distressed textures, and intricate details may need to be simplified.

Artwork with photographs, gradients, shadows, or many colors may require a printed full color transfer product or a standard printed sticker. The best choice depends on the actual artwork, final size, and production method.

Do not assume that removing a background from an image automatically makes it suitable for a transfer decal. The remaining elements still need to survive cutting, handling, and installation.

What Should You Ask Before Ordering?

If a product description is unclear, ask the printer these questions:

  1. Will this apply as one piece or as separate transferred elements?

  2. Does it arrive with application tape?

  3. What material will remain visible after installation?

  4. Is it appropriate for my exact surface and location?

  5. Should it be installed inside or outside the glass?

  6. Is my artwork detailed enough to require printing rather than cut vinyl?

  7. What file type and final dimensions should I submit?

  8. Are there special installation or care instructions?

A clear answer to those questions will prevent most ordering surprises.

The Simple Way to Choose

Choose a custom sticker when you want a complete printed piece that is easy to peel, apply, share, sell, or add to packaging.

Choose a transfer decal when you want letters or graphic elements to remain on the surface without a visible background connecting them.

If the terminology on a product page still feels vague, focus on construction and application. Ask what layers arrive, what remains after installation, and whether the material suits the intended surface.

Sticker versus decal is not merely a vocabulary question. It is a decision about appearance, installation, artwork, and use. Once those four details are clear, choosing the right product becomes much easier.

Compare sticker styles and materials and read our surface preparation guide. For questions about a specific application, contact Rogue Stickers before ordering.
Posted on

How to Choose the Right Custom Sticker Size for Any Project

How to Choose the Right Custom Sticker Size for Any Project

How to Choose the Right Custom Sticker Size for Any Project

Choosing a custom sticker size sounds simple until you open the order form and see a long list of dimensions. Suddenly, a two inch sticker feels too small, a four inch sticker feels too large, and the artwork on your screen offers no useful sense of scale.

The good news is that there is no single correct size for every sticker. The right choice depends on where the sticker will be applied, what the design needs to communicate, and how close the viewer will be when they see it.

A small logo sticker can look sharp on a product box and disappear on a storefront window. A large decal can be perfect for a cooler and awkward on a reusable bottle. Size changes how the design looks, how easily it fits the surface, and how clearly people can read it.

This guide will help you choose a practical size before you order.

Is There a Standard Size for Custom Stickers?

There is no universal standard size that works for every custom sticker. Common dimensions exist, but they are starting points rather than rules.

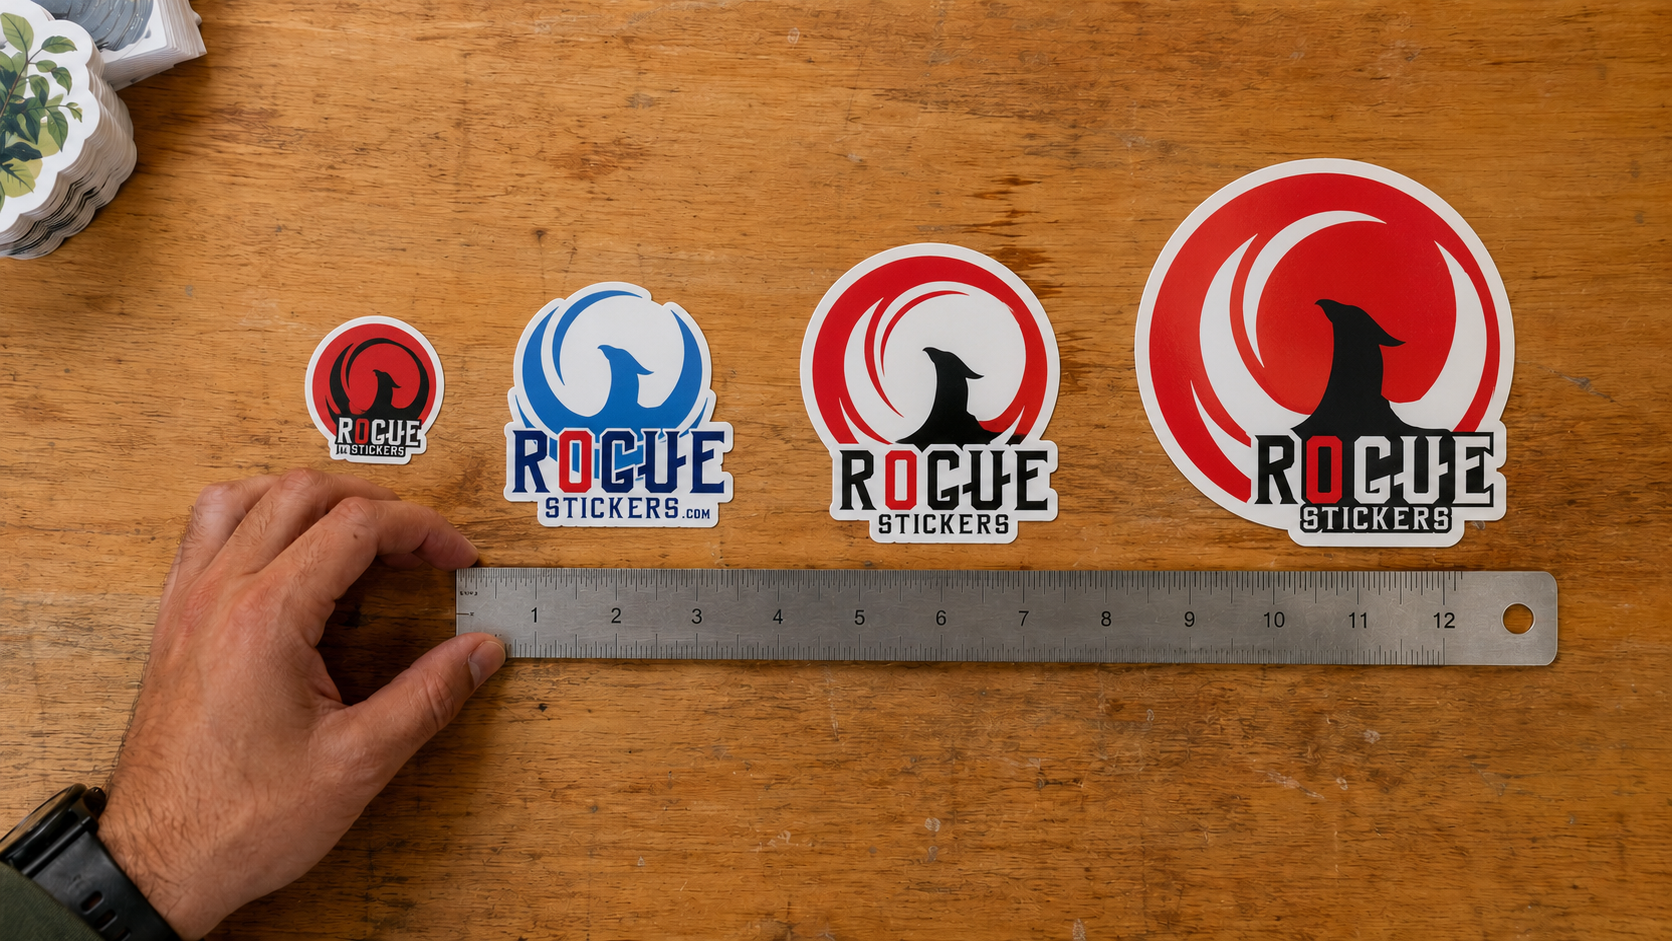
Smaller stickers are often used for packaging, seals, and subtle branding. Medium sizes work well for promotional giveaways, laptops, water bottles, and general logo stickers. Larger stickers and decals are better suited to windows, vehicles, coolers, equipment, and places where the design needs to be seen from farther away.

Your design may also change the dimensions you need. A simple icon can remain clear at a small size. A detailed illustration, long business name, website address, or line of small text usually needs more room.

The best question is not, What size do most people order? The better question is, What size will make this design work on its intended surface?

Start With the Surface, Not the Artwork

Before choosing a size, decide where the sticker will most likely be used. Measure the available area with a ruler or tape measure. Do not estimate from memory.

Pay attention to edges, seams, handles, curves, ridges, and moving parts. A sticker may technically fit within the total width of a surface but still cross an area that makes clean application difficult.

For product packaging, measure the flat panel where the sticker will sit. For a bottle or tumbler, measure the usable area between curves. For a laptop, consider whether the sticker should stand alone or leave room for other designs. For a vehicle or window, consider the distance from which the decal needs to be understood.

Once you know the available space, choose a size that leaves the design room to breathe. A sticker that nearly touches every edge can feel crowded even when it fits.

What Size Sticker Works Best for Product Packaging?

Packaging stickers need to fit the package without competing with required product information, shipping labels, or the opening of the container.

For a small box, pouch, jar, or mailer, a sticker around one and a half to three inches may be a useful starting point. The exact choice depends on the package and the amount of information in the design.

A simple logo or seal can work at the smaller end of that range. A sticker that includes a business name, short message, website, or QR code may need more space. If the sticker wraps around an edge or sits on a curved container, test the shape and size before committing to a full order.

Print the design on ordinary paper at the intended dimensions, cut it out, and place it on the package. This quick test reveals scale problems that are difficult to notice on a monitor.

What Size Sticker Is Best for Water Bottles and Tumblers?

For many reusable bottles and tumblers, a sticker around two to three inches on its longest side is a practical place to begin. The right size still depends on the bottle.

Curved surfaces deserve extra attention. A design that is too wide may be harder to apply smoothly because the edges must follow the curve. A compact design with a balanced shape is often easier to position.

Measure the straightest part of the bottle and avoid areas that narrow quickly. If your artwork is a wide rectangle, make a paper test before ordering. This is especially important when the design contains text that must remain level and readable.

What Size Sticker Is Best for a Laptop?

Laptop stickers usually have more flexibility because the lid is flat. A size between two and four inches can work for many designs, depending on the laptop and the visual effect you want.

Choose a smaller size if the sticker will be part of a collection. Choose a larger size if it is meant to be the main design on the lid. Detailed artwork may need more room than a simple logo mark.

Remember that laptop sizes vary. Measure the actual lid and account for any manufacturer logo, raised detail, vent, hinge, or textured area that could affect placement.

What Size Works for Promotional Giveaways?

Giveaway stickers should be large enough to feel valuable but versatile enough to fit the places people commonly use them.

A size around two and a half to three and a half inches is a useful starting range for many logo stickers, event graphics, mascots, and illustrations. It offers room for a strong design without limiting the sticker to one specific surface.

For Austin markets, concerts, restaurant openings, brand events, and community gatherings, portability matters. A sticker that fits easily into a pocket, bag, or merchandise order is easier to distribute. The design should still be clear at actual size, especially if it includes a local reference, event name, or business identity.

How Large Should a Window or Vehicle Decal Be?

Window and vehicle decals usually need to be larger because people see them from farther away. There is no responsible way to recommend one size without knowing the viewing distance, the amount of text, and the available surface.

Start by measuring the exact application area. Then print a paper version of the design at the proposed size and view it from the expected distance. If the business name or message cannot be read quickly, the artwork may need to be larger or simpler.

Do not place a vehicle decal where it interferes with the driver’s view, required markings, lights, sensors, handles, hinges, or moving parts. For business windows, check the glass for existing signs, seams, frames, coatings, and local requirements before ordering or installing a large decal.

Does Sticker Shape Change the Size You Should Order?

Yes. Sticker dimensions are usually based on the widest and tallest points of the finished shape. Two stickers can share the same listed size and still have very different amounts of visible artwork.

A three inch circle uses space differently from a three inch wide wordmark. A tall mascot may appear larger than a wide, narrow logo even when both share one listed dimension. A die cut shape with several narrow points may also have less visual weight than a solid square or circle.

Look at both width and height before approving the size. Do not rely on only one measurement.

If the design has an unusual outline, place it inside a rectangle that matches the proposed finished dimensions. This shows how much of the available area the actual artwork will occupy.

How Does Design Detail Affect Sticker Size?

The more information a sticker contains, the more space it usually needs. Fine lines, small type, detailed illustrations, QR codes, and multiple brand elements can become difficult to see when reduced.

Before ordering, view the artwork at its actual printed size. Do not judge it while it fills a large computer screen. Print a paper copy or set the document view to match the final physical dimensions as closely as possible.

Ask these questions:

  1. Can the main image be recognized immediately?
  2. Is every important word easy to read?
  3. Does the design still have clear space around its elements?
  4. Are thin lines and small details still visible?
  5. Does the design look balanced in the chosen shape?

If the answer to any of these questions is no, increase the sticker size or simplify the artwork.

Should You Choose a Smaller Sticker or Simplify the Design?

Sometimes the application requires a small sticker. In that case, making the sticker larger is not an option. The better solution is to simplify the design.

Remove secondary text, shorten the message, strengthen contrast, and focus on one recognizable visual idea. If the full logo contains a long tagline, consider using the logo mark without the tagline. If a detailed illustration becomes muddy at a small size, create a simplified version for stickers.

Good sticker design is not about fitting everything onto the surface. It is about making the most important element clear.

How Can You Test Sticker Size Before Ordering?

An actual size paper test is one of the easiest ways to avoid choosing the wrong dimensions.

  1. Set the artwork to the proposed finished size.
  2. Print it at one hundred percent scale on ordinary paper.
  3. Cut around the approximate sticker shape.
  4. Place it on the intended surface with removable tape.
  5. View it from the distance at which people will normally see it.
  6. Test a second size if the first version feels too small or too dominant.

This does not reproduce the color, material, adhesive, or finish of the final sticker. It does provide a reliable sense of physical scale.

What Should You Review in the Digital Proof?

The proof is your final opportunity to confirm how the sticker will be printed and cut. Rogue Stickers provides an online proof before production, so review it carefully. Rogue Stickers proof information

Confirm the finished dimensions, spelling, artwork orientation, border, cut line, and overall shape. Make sure important text and design elements are not too close to the cut edge. If the size shown in the proof is not what you expected, ask for clarification before approving it.

A proof can confirm the production layout, but it cannot decide whether the sticker will look appropriately sized on your bottle, box, laptop, cooler, window, or vehicle. That decision should be made through measurement and an actual size test.

Final Checklist for Choosing a Custom Sticker Size

Before placing your order, confirm the following:

  1. You measured the actual application surface.
  2. The sticker avoids seams, sharp curves, handles, hinges, and moving parts.
  3. The main artwork is clear at the finished size.
  4. All important text is readable.
  5. The width and height match the shape of the design.
  6. You printed a paper test at actual size.
  7. You reviewed the finished dimensions in the proof.

Choose the Size That Serves the Design

The best custom sticker size is not necessarily the size everyone else orders. It is the size that fits the intended surface, keeps the artwork clear, and gives the design the presence it needs.

Measure first. Test the design at actual size. Simplify it when necessary. Then review the proof with the final application in mind.

Whether you are creating packaging stickers for a Texas business, giveaway stickers for an Austin event, or durable decals for everyday use, thoughtful sizing will help the finished piece look intentional from the moment it is applied.

Read our sticker artwork preparation guide and proofing FAQ. For questions about a specific application, contact Rogue Stickers before ordering.

Posted on

5 Ways Custom Packaging Stickers Help Turn First Orders Into Repeat Customers

Make Your Brand Recognizable Before the Box Is Opened

Getting a customer to place an order is difficult. Getting that customer to remember your business after the package arrives can be even harder.

For an online business, packaging is one of the few physical interactions a customer has with your brand. The box, mailer, tissue paper, product label, and small details inside the order all influence how the purchase feels.

Custom packaging stickers give small businesses a practical way to make that experience feel more intentional without investing in completely custom boxes or expensive packaging.

A sticker alone cannot guarantee customer loyalty or double your repeat purchase rate. What it can do is help customers recognize your brand, feel appreciated, find their way back to your store, and remember the experience when they are ready to order again.

Here are five ways to put custom stickers to work in your packaging.

1. Make Your Brand Recognizable Before the Box Is Opened

A plain shipping box does its job, but it does not say much about the business behind the order.

Adding a custom logo sticker to the outside of a box, mailer, bag, or envelope immediately connects the delivery to your brand. That recognition matters, especially when a customer has several packages arriving during the same week.

Your logo sticker does not have to be complicated. In many cases, a clean logo, recognizable brand color, and simple sticker shape will look more professional than a design crowded with text.

Good places for a custom logo sticker include:

  • The center of a shipping box
  • The flap of a mailer
  • A paper shopping bag
  • Tissue paper inside the package
  • A product box or protective sleeve
  • The front of a thank you card

The goal is consistency. The colors and style should match the website, product, and social media presence the customer already recognizes.

Shopify describes packaging as an opportunity to reinforce a brand and make customers feel valued during the unboxing experience. It also recommends beginning with one clear brand element on the package rather than making the presentation unnecessarily complicated. Shopify

2. Use Thank You Stickers to Make the Order Feel Personal

Customers know that an online order is part of a business transaction. A sincere thank you can still make that transaction feel more human.

Thank you stickers are especially useful for Etsy sellers, Shopify stores, local retailers, bakeries, boutiques, artists, subscription businesses, and other companies that pack orders by hand.

Instead of using a generic message, write something that sounds like your business.

Consider wording such as:

  • Thank you for supporting our Austin small business
  • Packed with care just for you
  • You made our day
  • Thanks for shopping small
  • We are glad you found us
  • Made in Texas and packed with gratitude

A thank you sticker can seal tissue paper, close an envelope, hold a note in place, or appear directly on the product packaging.

The message should be warm, brief, and easy to read. It should not feel like another advertisement. Appreciation works best when it sounds genuine.

3. Give Customers a Simple Reason to Order Again

Good packaging celebrates the current purchase. Smart packaging also creates a path toward the next one.

A custom sticker can include a short return offer, reorder reminder, or customer reward. For example:

  • Save 10 percent on your next order
  • Scan to reorder your favorite
  • Come back for the next collection
  • Share your order and tag us
  • Join our rewards list
  • Refer a friend and receive a thank you gift

Keep the offer simple. If customers must enter a long code, visit several pages, or read fine print, fewer people will act on it.

The promotion should also fit your margins. A future discount is not the only option. Early access, a free sample, a limited product, or entry into a customer giveaway may be more valuable to your audience.

The sticker can go on a thank you card or packaging insert so the customer can keep it after discarding the shipping box.

4. Add a Custom QR Code Sticker With a Clear Purpose

A QR code can connect physical packaging to an online action in seconds. The mistake many businesses make is adding a code without explaining why anyone should scan it.

Do not print only a QR code. Pair it with a clear benefit.

Examples include:

  • Scan for care instructions
  • Scan to reorder
  • Scan for your next purchase offer
  • Watch how your product was made
  • Join our loyalty program
  • Leave a review
  • Follow our newest product releases

Always test the code at the actual printed size before approving production. Scan it with more than one phone, check it under normal indoor lighting, and confirm that it opens the correct mobile friendly page.

You can also add tracking information to the destination URL. Google Analytics supports UTM campaign parameters that help identify which campaign or marketing material generated website traffic. Google Analytics Help

A tracked packaging link might identify the source as packaging, the medium as QR code, and the campaign as customer reorder. This gives you a better way to measure whether customers are using the sticker.

5. Choose the Right Sticker Format for the Job

One common question is whether a business should order roll labels or die cut stickers.

Roll labels are generally designed for fast, repeated application. They can be useful when the same label must be placed on hundreds or thousands of bottles, jars, pouches, or boxes.

Die cut stickers are individually cut around the shape of the artwork. They are a strong choice when presentation, custom shape, and versatility matter. They can be applied to packaging, included as a free sticker, handed out at events, or used as branded merchandise.

Here is a simple way to compare them:

Packaging need Format to consider
Repeated product labeling at high volume Roll labels
Custom logo shape Die cut stickers
A sticker customers can keep Die cut stickers
Sealing tissue paper or envelopes Circle, square, or oval stickers
Branding clear bottles or product windows Clear stickers
Several designs packaged together Sticker sheets
Detailed artwork that should be easy to peel Kiss cut stickers

The correct choice depends on the surface, application method, quantity, artwork, and whether the sticker is part of the packaging or part of the customer experience.

Three Packaging Concepts to Try

These examples are packaging concepts rather than customer case studies. They show how different businesses could combine stickers without overcomplicating the package.

The Shopify Clothing Brand

Place a custom logo sticker on the outside mailer. Seal the tissue paper with a smaller thank you sticker. Add a QR code insert that takes the customer to garment care instructions and a matching collection.

The Etsy Candle Seller

Use a clear logo sticker on the candle vessel, a branded seal on the product box, and a thank you sticker on a handwritten note. Include a QR code leading to scent care instructions and the reorder page.

The Austin Food Business

Add a branded sticker to the carryout bag or product package. Use a second sticker with a simple message about the local business. A tracked QR code can direct customers to current menus, ordering information, or seasonal products.

How to Measure Whether Your Packaging Is Working

Do not assume that new packaging is successful simply because it looks better.

Choose a starting date and monitor:

  • Repeat purchase rate
  • QR code visits
  • Reorders using the packaging offer
  • Customer reviews mentioning packaging
  • Social posts featuring the unboxing
  • Packaging related customer service issues
  • Product damage and return rates

Test one meaningful change at a time. This makes it easier to understand which sticker, message, offer, or placement influenced the result.

Start With One Memorable Detail

A small business does not need luxury boxes, several layers of inserts, or expensive filler to create a thoughtful package.

Start with one useful improvement. Add a clean logo sticker. Seal the tissue paper with a genuine thank you. Give the customer an easy way to reorder. Then measure what happens.

Rogue Stickers prints custom business and packaging stickers in Austin, Texas, with an online proof before production. Whether you need custom logo stickers, die cut stickers, clear stickers, sticker sheets, or classic label shapes, the goal is the same: make your packaging look intentional and help customers remember the business behind the order.

Ready to improve your next shipment? Explore the custom sticker options at RogueStickers.com or contact the team for help choosing the right sticker for your packaging.

Written by Robert Mendieta
Owner, Rogue Stickers
Austin, Texas

Compare custom logo stickers and multi-design sticker sheets. For questions about a specific application, contact Rogue Stickers before ordering.